How to Photograph Wildflowers with Flash
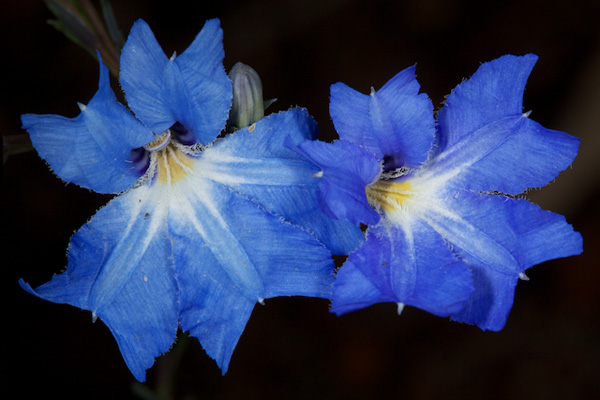
Blue Lechenaultia (Lechenaultia biloba) / Photo by Rob Neave
Note from Steve: This is a guest post written by Rob Neave, of Perth, Western Australia. In this post he talks about an interesting technique for photographing wildflowers with flash. As always, if youʼre also interested in writing a guest post, please feel free to contact me. Thanks!
________
My state of Western Australia is wildflower central for the known universe. For years, I was entranced by their potential as photographic subjects, but could not figure out how to do it. Eventually I bought a book called “Field Photography” by Alfred A Blaker, which showed me how to get decent shots of wildflowers.
Although the techniques presented in Blaker’s book were originally written for film photography, I have been able to also apply them to digital photography and ETTL flash.
The photo above is an example of what you’ll be able to do with these techniques. The flowers in the photo are Blue Lechenaultia. This image shows the detail and depth of field (DOF) we can get with these techniques. It was shot at f/32 and 1/200 with flash.
This method of photographing wildflowers shares the same objectives as the method described in Steve’s book, but achieves them by a different route. We want photos that reflect the beauty of the flower in its natural state, while eliminating any distracting background clutter.
Advantages of this technique
- Large depth of field
- Suppressed background
- Doesn’t always require a tripod
- Independent of ambient lighting
- Helps stop motion blurring of subject
- Needs some special equipment
- Not much choice in background
Why use a close-up flash?
We need to get a flower subject to fill our frame to get as many useful pixels as possible recorded. When we photograph at high magnification (say 0.2 to 1.0), the depth of field becomes very small and we end up with part of the subject in focus and the rest a blur. The way to overcome this is to shoot with a small aperture. I use f/32 for the closest subjects and a bit wider for subjects further away.To get enough light into the lens under these conditions, you need to illuminate the subject with flash. The ETTL process will calculate the exposure, and the ambient light will play no part at all.
What equipment do you need?
Single Lens Reflex (SLR) Camera. I have used this technique with film and digital SLRs, and even with a medium-format Mamiya camera. Compact “point and shoot” cameras usually don’t have small enough aperture settings.Macro Lens. A macro lens is different from the “macro” setting on a zoom lens in that it provides up to lifesize magnification (also known as 1.0x). That means the image on the sensor or film is the same size as the subject. That’s the sort of magnification you need. Personally, I use the Canon 100mm macro lens.
Flash. Now what sort of flash? The key is to have enough power–more is better. Any regular flashgun with ETTL used with an off-camera cord will do the job, as it has far more power than a macro flash, but it’s a bit hard to handle. My choice was the Canon M24 EX macro flash, which has two little flash heads mounted on the front of the lens.
When choosing my flash, I suspected that the ring flash would not have enough power, although I have never tried one. If you do not have enough flash power, you will have to compensate by opening up the aperture. The M24 has the advantage of some separation distance between the flash heads, and the ability to set one brighter than the other. This helps avoid both too much “flatness” in the image, and harsh shadows.
Here’s a photo of the Canon M24 flash that I use:
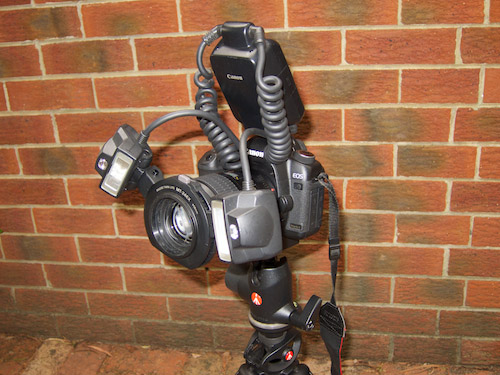
Canon M24 Flash / Photo by Rob Neave
How to photograph the flower with flash
- Set the camera’s shooting mode to Manual (usually marked with an “M”)
- Set the aperture to the highest number available (usually f/22 or f/32)
- Set the shutter speed to the fastest sync speed of your camera
- Set your auto focus to center point only
- Compose and focus. If your autofocus has problems, you may need to turn it off and get a sharp focus by moving the camera towards and away from the subject.
- Fire a metering flash, choosing a light part of the subject. For the Lechenaultia shot above, I did the metering flash on the white part of the flower.
- Final compose, focus, and shoot
Remember that you are maximizing depth of field. So, crossing stems and other distractions that do not show up in the viewfinder with the lens wide open, will come out sharply when the lens stops down and if they’re within range of the flash. Sometimes it’s necessary to push some of them aside to get a clean image.
For larger subjects, you will have to get farther back and the flash will have to project farther. After you do the metering flash, your camera will tell you if your aperture is too small. Macro flashes are pretty weak, so it may be necessary to open the aperture a bit to compensate. This is not a big problem because, as you get further away from the subject, you do not need such a radically small aperture as depth of field naturally increases too.
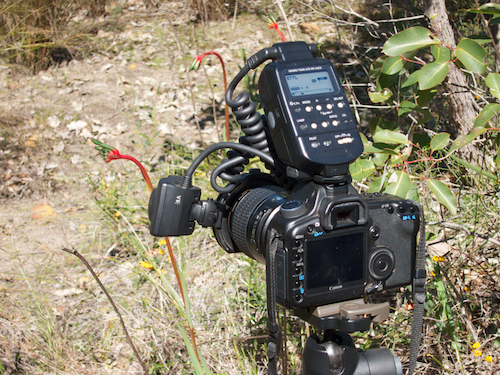
As an example, here’s the setup I used for a larger subject, a Kangaroo Paw:
And here is the result, complete with crossing stems! I guess not every shot can be a winner.
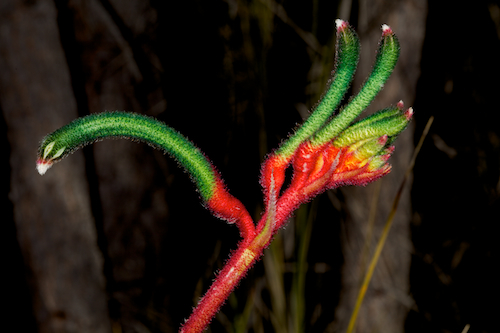
Kangaroo Paw / Photo by Rob Neave
Do you need a tripod?
Many wildflowers grow pretty close to the ground, so a tripod can be both inconvenient and unnecessary for shooting them with this method. If you have your elbows on the ground, your camera is firmly enough supported. The same applies if you sit on the ground with your elbows on your knees.Composing and focusing is easier without a tripod. Steve has emphasized the need to get down (and often, dirty) and look the subject in the face. He is right. For subjects above sitting height, a tripod is a big help. It is too easy for the shot to go out of focus if you are handholding the camera while standing or kneeling.
A Note on Post Processing…
Sometimes with this method you don’t always get a dark enough background, so try raising the black point with a Levels adjustment to further suppress the background.Remember to “leave no trace”
All the flowers I photograph are growing in their natural location. None have been picked or relocated. It’s important to leave no trace while photographing wildflowers so others can enjoy them, and so they can return again next year!In conclusion, I think this little cutie, Rusty Spider Orchid, Caladenia ferruginea illustrates the benefits of the method..
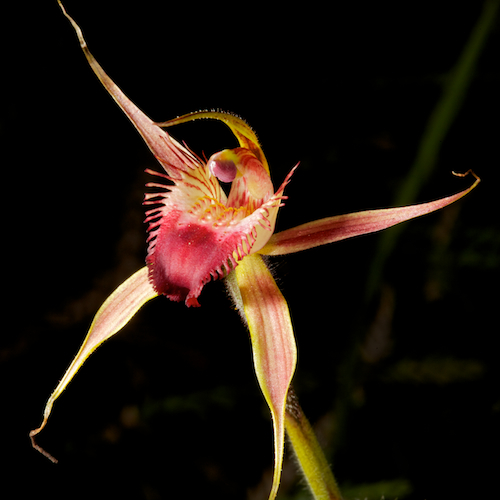
Rusty Spider Orchid / Photo by Rob Neave
About the Author: Rob Neave lives in Perth, Western Australia. A keen photographer, he has specialised in imaging the local wildflowers for many years. He has many publication credits both for flower close-ups and for scenic shots. Rob has now retired from a career as an engineer building power stations, to spend more time on grand-parenting and photography.
No comments:
Post a Comment