Sunday, December 19, 2010

How To: Process and Save RAW Files

How To: Process and Save RAW Files

Shooting and processing images in RAW allows for more creative freedom.

Shooting RAW can be daunting, especially if you don’t know what to do with the files when you get them out of the camera. Unlike JPEGs, which are “cooked,” RAW files contain a ton of data that must be manipulated before you can edit your image and make it small enough to be e-mailed and viewed by family and friends.

Despite the extra work, RAW files are worth it. They let you control white balance, saturation, and contrast as if you were doing so while shooting. Because RAW files utilize lossless compression, you should be able to get better detail and sharpness, without artifacts, when you enlarge them. Finally, you’ll have more of a chance of recovering what seems like lost shadow and highlight detail in your picture.

Here are the basics on how to open, convert, and save your RAW files, from start to finish. These instructions are for Adobe Photoshop CS5, but will work similarly in previous versions and in Elements.

F.Y.I.:
Most cameras give you the option of shooting RAW+JPG. Doing so is not a bad idea if you have lots of pictures you’ll want to share quickly online. Because RAW files are larger, shooting both uses up memory card and hard drive space faster. Devotees of RAW often opt to forego the JPEGs and instead use a program dedicated to RAW, such as Apple Aperture or Adobe Lightroom, to quickly process their RAW files into JPEGs.

Step 1:

Because RAW files must be converted before you can edit them, opening a RAW file from Adobe Bridge automatically brings up Adobe Camera Raw (ACR), the conversion plug-in that comes with Photoshop. To start the process, simply find your image in Bridge and double-click on it.

Step 2:

The most important tools for conversion are in the Basic tab of Adobe Camera Raw, which appears by default on the right side of your screen. Adjust the sliders to get the look you want. Start by adjusting Exposure to set the white point and Blacks to set the black point. If you don’t like your image’s white balance, use the pulldown menu to choose a preset or adjust the Temperature and Tint sliders. Then add Clarity for more midtone contrast, and Vibrance if you want more intense colors.

Step 3:

Now go to the Detail tab. Although JPEG sharpening happens in the camera, RAW files need sharpening applied during conversion. ACR automatically adds a little sharpening—adjust it as needed. The program also does a little noise reduction by default. Images like this one, shot at ISO 100 in bright daylight, typically need no noise reduction, so it’s turned off here.

Step 4:

To choose the settings with which you’ll open your file, click on the link running along the bottom of the screen: it will bring up a dialogue box. Because you want to create the highest quality file possible, with the most information contained in it, choose the ProPhoto RGB color space, a bit depth of 16 Bits/Channel, and your camera’s maximum megapixel amount. Click OK. Then hit the Open Image button to bring the file into Photoshop.

Step 5:

Now save your file—this will be your master file. Go to File > Save As, and choose Format: TIFF. The default TIFF options are fine. Do all of your image editing and retouching, and continue to save as you work.

Final Step:

When you want to print or share your file, prep your master file first. For printing, resize it to the print size and then sharpen. For e-mailing, shrink it and then sharpen. Finally, before you e-mail, change the color space to sRGB by going to Edit > Convert to Profile. Choose sRGB as your Destination Space and click OK.



Understanding Digital Camera Color Space Choices

Understanding Digital Camera Color Space Choices


Adobe RGB vs sRGB color space gamut diagramMost digital SLR cameras allow the photographer to choose a color space for images captured in the Jpeg file format. Photographer’s with these cameras face two color space choices—sRGB and Adobe RGB. You need to know that the camera’s sensor is able to record a tremendous variety of colors that could never be printed out or displayed on a computer monitor to understand this important setting.
The camera’s processing engine will automatically shift an unprintable shade over to the closest acceptable alternative when shooting in Jpeg. The color space parameter controls this color shift process. Camera geeks and digital experts can go on for days about the theoretical advantages of one color space over another but the important part to me is the goal. The color space parameter sets your file’s “gamut limit.” The color space defines the range of theoretical colors that the file can utilize.
The sRGB gamut is a close match to the range of colors that the average computer monitor can display. sRGB is an excellent color space choice for photographers whose work will only appear on the screen and on the web. It’s also the color space that most photo labs are expecting. Adobe RGB offers a larger gamut meaning a wider range of colors. Bigger is better but you must understand that some of the theoretical colors in the Adobe RGB bubble cannot be reproduced accurately unless you are using the best computer monitors and the highest-end inkjet printers.
I define the term “direct to print photographer” as someone who prints photographs directly off their digital camera’s memory card. My mother, for example, takes her digital camera memory cards to the local photo lab for quick and easy printing. There is no Photoshop and no post-processing involved in my mother’s photographic workflow.
The local lab prints her Jpeg files right off the memory card. For a direct to print photographer, the color space choice is critical but easy. sRGB makes sense for photographers like my mother because it is the color space that her photo lab is expecting. Most commercial photo labs, and almost all of the direct to print inkjet printers on the market today, are designed for use with sRGB files. If you try to print out an Adobe RGB file then your colors – particularly your reds – will appear flat and dull.
My mother and I have very different photographic needs and routines. I’m a professional photographer and an Adobe Photoshop Lightroom expert. I am proud to say that my photography has achieved a level of sophistication where color gamut decisions are of critical importance. For professionals, and serious photo enthusiasts, shooting in a Raw rather than Jpeg makes the most sense because Raw files do not have a fixed color space. With digital camera Raw files, we get to make all of our color conversion decisions after the image has been captured!
Digital camera raw files do not have a fixed color space because these file’s do not yet contain pixels. Raw files are a record of the unprocessed “sensel” data which exceeds all gamut limits. Flexibility of color, and of color space, is one of the greatest advantages to digital camera raw files. Serious photographers often shoot in raw so that they can pick the appropriate color space for each processed copy of their original capture using post-processing software. Adobe Photoshop Lightroom makes this process completely painless since color space is one of the parameters that we can control, and automate, inside of the Export dialog.
My advice is to keep life simple. I suggest that photographer’s of any level shoot Jpeg images using the sRGB color space. Using sRGB in camera will give you files that can be printed directly off the memory card. If you need more control over color, if a wider gamut will help with your work, then bring home Raw files and learn to use post-processing software like Lightroom or Photoshop CS5.
For more information on the significant advantages that larger color spaces offer please watch this insightful video tutorial from Adobe Photoshop master John Paul Caponigro.
If you liked the video then please click here for excellent articles on color management from John Paul Caponigro. John Paul’s articles are free but you will need to register with his website. For those seeking more insight on this topic, I also recommend reading Tim Grey’s Color Confidence: The Digital Photographer’s Guide to Color Management (Tim Grey Guides). You can download one of the book’sbest chapters for free here.
Those seeking the most technical information about the whole science of color management need to read Bruce Fraser’s definitive book on Real World Color Management.

9 Free iPad Apps to Kick-start Your Photography

9 Free iPad Apps to Kick-start Your Photography

By Light Stalking


The fact that the iPad does not have a camera does not stop it from being one of the most powerful photography tools on the planet. There are tons of free and cheap apps which can turn all of your photos into dazzling masterpieces. Of course once you’ve got these beautiful works of art, you want to share them, and that is definitely the iPad’s domain! Here are 9 free iPad apps to amp up your photography.
iPad :)photo © 2010 Rego Korosi | more info (via: Wylio)
Live FX Lite – Live FX Lite is a free app which lets you spruce up your photos on the go. This program allows you to even set your own push-button presets with dozens of effects. Adjust focus, lighting, cropping, hue and more for various and fun outcomes to share with friends and family.
Photobuzz - Photobuzz allows you to view public photos from Flickr and Picasa. These can be albums shared between friends, hobbyists or professionals. Share your favorite shots with others, and gain pointers from fantastic images from others.
Feeddler – This free iPad app is actually a simple RSS reader, but allows you to tap into any websites you want for photo news, tips, tricks, tutorials, and much more. Stay on top of the photography world with just a few taps.
PhotoPad – The iPad itself may not take photos, but it can be a powerful tool for enhancing them on the go. PhotoPad can help you by allowing you to crop, scale, apply filters, and adjust the color of your images. This allows you to adjust the basics of photos including value and contrast, to quickly share perfected photos. You can also allow your creativity to blossom by using the different filters available with the program.
Colors Pro Free – This iPad app allows you to selectively color and desaturate elements of your photos for fun and creative effects. It also allows you to zoom in and move for fine-detail work and professional results. Unlimited undos means you don’t have to worry about mistakes and you can quickly share photos via email or other tools.
Impression – This free iPad app does one simple but important thing: adds watermarks to your pictures. This way you can share your images straight from your iPad to the web at large while reducing the fear of your work being taken without attribution. Watermarking isn’t a perfect solution, but it’s better than nothing.
Phanfare – This is a free companion to the Phanfare service, allowing you to store all of your images remotely. No more worrying about what will happen to your photos if you iPad crashes or gets stolen. Once they are “in the cloud”, they are safe.
Rough Guides World Lens – The Rough Guide photographers make a living out of traveling the world and photographing the places they go and things they experience. You can now have a free iPad app which allows you to see some of the more breathtaking images and gather an unlimited amount of inspiration. If you get bored, don’t worry. The images are updated every few weeks for you!
Foto Editor – Yet another app you can use to edit your photos. While this free app might not have the same plethora of options and tools as some of the paid versions, it still allows you to edit the brightness, contrast, gamma and RGB channels, and rotate the pictures you have.


10 Unconventional Tips to Become a Better Photographer

10 Unconventional Tips to Become a Better Photographer

Being a better photographer is not always about owning fancy equipment or expensive lenses. In fact, it all comes down to lots of practice and a bit of trial and error. These simple tips only act as guidelines and you are more than welcome to challenge the status quo and push the boundaries.
I’m writing this from my own perspective and learning experience. Some of these tips might be more obvious than others, but I’ll try to steer away from the clichéd photography tips you’d always hear.

1.) Take photos of ugly things

Stop photographing flowers, rainbows and puppies. Find yourself staring at something disgusting, uncomfortable and dirty – now try to make it look appealing in a photograph. If you can make a bag of garbage look artistically appealing, then you can make anything look great.
Garbage Day by Jeff_Werner


2.) Squint

In photography, lighting plays a major role in how your photo will turn out. You don’t want an image that looks flat. Always be aware of where the light source is coming from and any contrast in shadows and highlights. A simple tip is to gently squint and you’d soon be able to notice the lighting and color contrasts. If it’s all just a gray blur, then the photo probably won’t turn out as interesting.
High Contrast Asymmetrical by RandyA38


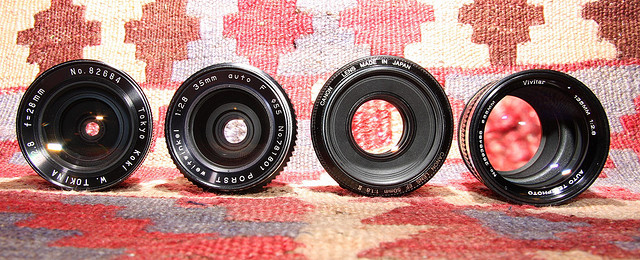
3.) Switch to a prime lens every so often

A prime lens is great as it really pushes you to see and compose things differently. It’s also useful for photographing random passers-by as it looks less intimidating than if you were pointing a long zoom lens at them.
Primes by barnoid


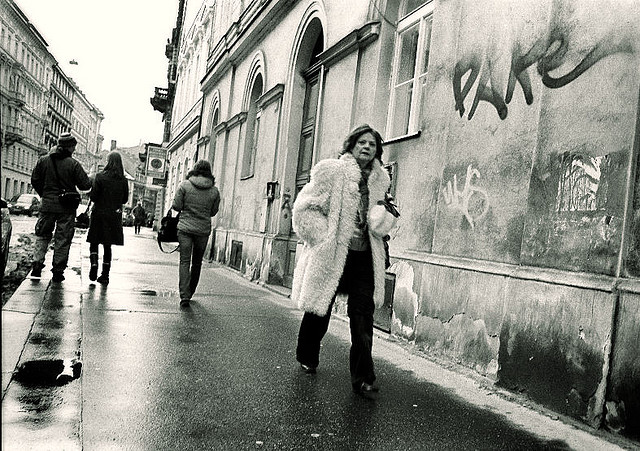
4.) Get into silly positions

Don’t be afraid to get yourself into strange positions in public. Stand, kneel, lie down or jump up if you have to. Try to see everyday things from a different perspective.
Shooting from the hip by Matti L


5.) Keep your bad photos

It’s tempting to delete a bad photo straight after you’ve taken it. But try not to, especially when you’re doing a series of shots. When viewed on your computer, you’d gain understanding of why it was a bad photo compared to the one you like. You’d learn from your mistakes much quicker and easier this way.
Worst Band Photo Ever by Sumlin


6.) Shoot like you don’t have Photoshop

Some photographers rely too much on digital post-processing. But you know what? There’s only so much you can do with a really bad photo. The time spent in the digital darkroom could be better spent actually getting the shot right. Invest some time composing and manually adjusting your camera settings at the time of the shoot.

7.) Take your camera with you… Everywhere

Find inspiration in your everyday routine and take your camera with you on your mundane routine. You’d notice the finer things you often miss when you walk to work. Or how the objects around your house can serve as a great prop or photo opportunity.
This old chair by Darwin Bell


8.) Read the boring manual

The camera manual can be long, boring and tedious. However, if you’ve taken the time to read through it one chapter at a time, you’d be surprised at little new features and functions you’d pick up. I’ve had my Canon 50D for nearly two years now and it was only the other day that I discovered about the Auto Lighting Optimizer.

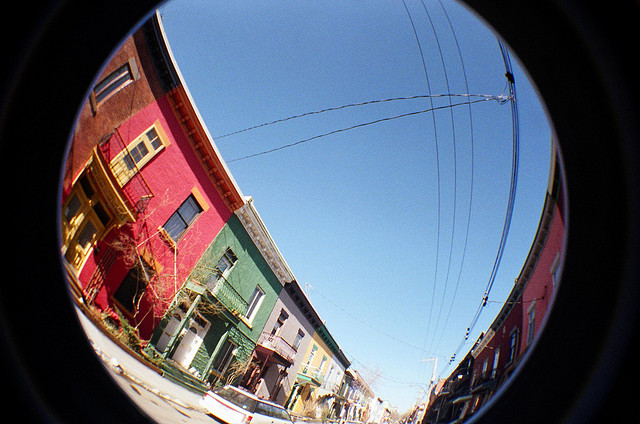
9.) Don’t just use one camera

Never get stuck using just one camera. From time to time, snap pictures with your mobile phone, point-and-shoot, plastic toy camera or even a disposal camera. You’d be pleasantly surprised at the different results each camera produces.
Fish eyed Henri Julien by diebmx


10.) Forget professional photographers

I enjoy looking at the extraordinary photos taken by very experienced professional photographers. However, not many of them motivate me to get off the couch and start taking amazing photos myself. That’s why I enjoy looking through blogs and photos written and taken by everyday photographers like myself. I’m more likely to find myself strolling through the park, than a chaotic war zone or secluded tropical island.
Everyday is gonna be alright by FotoRita [Allstar maniac]


10 of the Best YouTube Channels For Photographers

10 of the Best YouTube Channels For Photographers

Do you enjoy heading over to YouTube for a break – choose a video and get inspired for the day? You’re not alone. With millions of hours watched every day, there really is something for everyone. I’ve been doing a lot of research on YouTube lately, and in the process found some wonderful channels that you have to check out as a photographer. Know of any more? Leave a comment below – I’d love to find other professional YouTube channels just for photographers.
AJ Wood
Everything Adobe – whether you are looking for tutorials on Lightroom, Photoshop, or even Dreamweaver, these videos will give you hours of ideas.
Bert Stephani
Bert has been adding videos for a number of years; start with his Confessions of a Photographer series for some quick tips on photographing.
PeachpitTV
PeachpitTV provides a huge array of education and informative videos on a wide range of topics. You’ll find how-to’s on photography, and an interview series from some of today’s hottest photographers.


Karl Taylor’s Photography Tips and Techniques
From fashion shoots to basic photography skills, these professional videos will leave you with a variety of tips to make your photography business better. Watch his 840 Portraits in On Day – pretty amazing.
Mac Photography Tips
Watch videos on everything from digital photography to Photoshop from a wedding and event photographer based out of Sacramento California.
Cameralabs Digital Camera Video Reviews
Had your eye on a particular camera? Check out Cameralabs reviews first. With over 17 million views of his videos, this is the place to come to first.
Snapfactory
A very professional series of videos showing photographers how to be better at photography. Watch some of his videos for free, and try out YouTube’s new rental program – the way of learning for the future.
Photoshop tutorialsRick’s Pixel Magic
Rick Sammon provides some interesting tips on photographing and lighting your images.
ClixAndPixels’s Channel
Professional videos that give you a variety of shooting tips, and a view of what was created in the process. Composing and Framing your shot is a great video to help you photograph for advertisements.
Lynda.com
Have you used Lynda.com? It’s a great video training site that gives you in-depth training on anything software. This is Lynda’s channel, and gives a wide array of samples and how-to instruction on everything from Photoshop to a series of podcasts.

Baby Photography Tips and Lighting Setup

Baby Photography Tips and Lighting Setup

Tutorial by SASHA GiTiN
Watch this photography tutorial video to learn how to photograph babies.Newborns, infants using studio flash and double umbrella lighting.  With tips on photography lighting and studio set up.


In this baby photography tutorial video we cover the following topics:


  • Complete Studio or Home Set up
  • Amazingly soft Portrait Light using a Double Umbrella
  • Equipment needed for the shoot (simple and inexpensive also can be used for Portraits and Fashion, see the complete list below)
  • 2 poses with many variations
  • Tips on working with a baby

Tips for photographing a baby:


Easy with a Flash power
Try to avoid using strobe / studio flash with infants under 3 months old, instead try to utilize natural light.  With infants over 3 month old use the lowest power setting to minimize the negative impact. Instead increase ISO and open the f-stop. In my opinion, the high powered strobe flash can have a negative effect on a child’s development. 

baby pictures

High Powered Strobe is bad for newborns.

The first month of a child’s life is the most sensitive period for brain development.  When the baby is born, billions of brain cells that have developed while in the womb, begin to make first connections (synapses). Stimulation of the brain begins with sensory experiences.
baby portrait black and white
One of examples would be when child is observing the contrast between light and dark shapes. This fires up the neurotransmitters which create connections as they travel from cell to cell forming a network.  The network of these connections corresponds to intellectual capacity, memory, problem solving, and language.  But just imagine what  happens when 2500 watt per second of studio flash power is being released into a baby face?  I am not an expert on neurology, but in my opinion, flash will create a sudden sensory overload, most likely misguiding neurotransmitters and frying some cells, eliminating the opportunity for successful development.  
Based on my hypotheses, I would not recommend using flash to photograph newborn babies under 3 month at all. Reserve to natural light, or continuous light instead.  What I noticed by observing thousands of babies being photographed, is that baby’s immediate reaction to a flash pop, when the unit is set to 250ws and above and positioned close to the subject is the baby literally jerks and jumps back on each pop.  However, by lowering the power below 100ws, it does not seem cause any visual reaction. (In the video, my strobe was set to 1/32 of a power of 320ws unit) so each pop was only 10ws.  As you might have notice, Sammy did not exhibit any reaction to strobe pop, at all.
Bottom line:  Crank up your ISO – and carefully focus so you can keep you aperture open, so that you can control your exposure with ISO and f-stop, as appose to flash intensity. Trust me the grain in the image is definitely better than brain development complications.
More info on baby brain development: Making connections helping children build their brains

baby photo

Use soft Light.

I used a double umbrella for this photo shoot.  Double umbrella is a translucent umbrella and white reflective, or silver umbrella taped together at the ends of the stem.  Most of the umbrellas have an option of black cover to be removed. By removing the black cover the white reflective umbrella turns into translucent.  

Be ready to shoot.

The baby will generally only grant you  with a few minutes of good behavior.  Test your light and exposure prior to the first shot, use a doll or a soft toy to preset focus and exposure.
Direct babies attention with a sound “prrrrrrrrrrrrrrr” kind of works well.  


baby smile

How to Make Baby Smile:

Happy baby is the one who had his nap, was recently fed, is dry and comfortable. Babies instinctively will produce a social smile – meaning that if you smile at them they will smile back.  Ask the mother to stay right behind the camera.
DO NOT: This might be obvious but never shake the baby, shaking can cause brain damage.  Once again, do not use your strobe at a high power setting.   If the baby has any type of reaction to the flash pop, it means that the power setting is too high.  
Create a soft comfortable and safe environment; make sure that the camera is close enough so the baby is within your reach or within the parent’s reach.  Secure the photographing area, in case of a roll over, make sure there is no hard surfaces or objects for the baby to get hurt with.


Studio Equipment for baby photography:

studio setup for baby photography

A:  4 inch (medium) Spring Clamp (A-clamps).   A-clamps where used to secure background fabric to the telescopic poll. Also one clamp was used to secure the bouncer (H) to the stand (D)Price is about $3 per clamp.  You can get them at any hardware store.
B: Alien bee B800 flash unit.
C:  Bogen 2983 Telescoping Cross Bar  The most convenient and versatile background holder you will ever find.  It can hold any roll of background paper up to 9 feet wide. You can hang all sorts of fabric backgrounds on it with A-clamps.  It doesn’t need any special hook up because it can easily be attaches to any type light stand. (one on each end) It has three telescopic sections so it’s easy to transport on location and it’s very durable and light weight. I love it.
D: Manfrotto 367B Basic Light Stand. Great heavy duty stand. I used 2 of them is this shoot one was holding the light the other was holding the bouncer.  I had a lot of cheap stands in the past and they all died.  This stands survive all the abuse and still perform like new. Maximum height is 9 feet.
E: Manfrotto 5001B 74-Inch Nano Stand These stands are great for location work. They fold really small and extend to 6 feet 2 inches.  They can hold a studio light with umbrella or small softbox.  These two stand where supporting the crossbar (C), but I was worried that my 3 year old would knock them down. As she was running back and forth behind the set. So I would only recommend them for location use, for studio the (D) stands are better, they are more sturdy 
F: Calumet 45 inch Umbrellas. Also these are the best quality umbrellas I own.  I have used these for more than 10 years and they are still in great shape.  These are very versatile. The black backing is removable so the umbrella can be used as reflective soft white umbrella or as translucent/ shoot through umbrella. Or two can be hooked up together with tape for single light - double umbrella set up (as was done in this video) I also used it during a heavy rain, once, coming back from a shoot. (Kept me dry, True story)
G: Vivitar 285HV Flash Oh yeah they still make these. What a workhorse!!!  I think I have mine for about 15 years. Never broke.  I use it as a background light quite often. It can be used as on camera flash as well. (but I have canon 580 for that purpose) This unite is compact and battery operated. It takes any type AA batarries (4). I use rechargeable Sanyo Eneloop Hybrid Batteries with all my flash units, they seem to last the longest, and do not die when not used. Please note that to sink this unite wireless with your main flash you will need an optical slave (peanut) the flash will sink wireless within 100 feet from the main flash unite
H: Bouncer : Collapsible reflector. It bounces light back onto the subject feeling in shadows. Can be used with any light source. I often use this when I shoot portraits and still life. Sometimes I use it as a background or surface as well on small still life shoots or quick head-shots. One side is white the other is gold.
J: White canvas backdrop, it wrinkles a lot so I always keep it out of focus. You can iron it though it’s made out of cotton
K: Canon 40d camera was used to shoot these images. I used my 7d to record the video. I think, I like 40 d actually more than 7d because it has less color noise and finer grain (on lower iso).  24-70mm canon L 2.8 lens was attached to a camera. I have a dozen lenses but I use this this lens for about 85% present of all my work.   For this shoot the lens was set to about 40mm at f4
L. White sheer This is thin, translucent fabric, It was used it to place over the heavy cotton backdrop (J). Produces a light airy feel.  You can use regular sheer curtains or for larger set order by the yard: I used 20 yards of  118 inch wide fabric. from here: http://warehousefabricsinc.com/V118WHE.html

Saturday, December 11, 2010

Moving From Hobby To Business With Your Photography

Moving From Hobby To Business With Your Photography

The statistics overwhelmingly show that people love their cameras.
  • 77% of U.S. households own at least one digital camera.
  • Almost 120 million cameras were sold in 2009, with digital SLRs having a 30% growth in sales.
  • The average consumer takes 72 digital photographs at each event they attend.
  • They share 55% of all photos taken by email.
  • And 40% post their images online at sites like Facebook and Snapfish.
So why not take something you love anyway and turn it into a business? Maybe not a full time business, but something you can make money at here and there.
Increasingly, that’s what the photography industry is facing.
As a business coach to photographers for over 8 years now, I’m seeing more and more people making the jump. Though this site is filled with information and ideas on building the business, here are the 7 things you need to do right now to put this into action.
1. What are your goals? Do you want to photograph a few family and friends on the side, and make enough for a nice night on the town once in awhile? Or do you have hopes of turning this into a full time, successful career? Knowing this up front will dictate how you approach your business.
how to turn a hobby to a photography business
2. Choose the right name for your photography business. Once you know your goals, come up with a name that helps you meet your goals. The larger you want to become, the more time you should put into naming your photography business. A small business may only register it with the state or your local area. But a studio with larger goals should secure the domain name, and register a trademark to block others from using it too.
3. Look at it like a business. Find mentors in your specialty or niche. Want to go into weddings? Find a few where you love their work; follow them online, attend their classes, and meet them at tradeshows. Use them as your guidance to grow.

4. Get proper camera equipment. Sure you can show up at a wedding with a consumer grade digital SLR and a lens or two. But what if you drop the body, or the lens freezes? To be a professional, means great equipment and plenty of backup. You don’t always have to buy – why not rent lenses until you find what you want and can afford.
5. Use tools and software to give your photography an edge. There are many things that can help you become better at photography by being better at the business side. Photoshop is a definite must for photographers. Expand from there. We’ve been ACDSee to manage our workflow for years. Or how about online management tools that can help you with everything from having an online photo shopping cart system to allow you clients to buy online, to a site that manages your appointment calendar.
6. Practice your photography. Because most consumers have access to fairly decent camera equipment, you’re competing with a ton of amateur photographers. You have to not only stand out from the crowd, but completely WOW your potential customers. How can you create something beyond what your competitors are doing?
7. Price your photography like a professional. There is so much more to pricing your photography than choosing a random number. You have to take many things into account. Will you be able to afford better camera equipment? Is the rent of your studio covered?

Naming Your Photography Business – An Advanced Guide


Naming Your Photography Business – An Advanced Guide

One of the most popular questions that finds its way into my email box and throughout my various social sites is: What’s a good name for my photography business?
I’ve touched on a lot of issues in two of my posts:


But there are several other things you should think about when you’re deciding on a name, and a few resources you should keep in mind.

Will you be trademarking your name?

Twenty years ago, your photography business would only be in competition with other photographers in your local area. Not true anymore. Now you’re in competition with photographers from all over the world. If you travel regularly as a wedding photographer (as we did starting in the mid 1990’s) your branding extends well beyond local lines. Trademarking your name gives you added protection of having someone come in and choosing something similar, and trying to ride on your coattails. It’s also important as you expand into multiple areas: books, gift products, artwork, etc. 

What do I name my photography businessYou can trademark your name and any branding material, such as a logo. While there are many companies and law offices out there that will help you with the trademarking process, two of my favorite sites are Nolo and the USPTO. Nolo is a legal site filled with all kinds of help for small businesses. You can order books, legal forms, and even find a lawyer in your area if that’s your next step. They have a great book on Trademarking that gives you everything you need to know about the trademark process and protecting your name. The USPTO (U.S. Patent and Trademark Office) has a ton of information on trademarking. They have an online search function that allows you to put in your name ideas, and see if anyone else has trademarked it. And once you file for trademark status, you can follow it online as well.

Check out domain names.

I mentioned this before in one of the above articles, but because of its importance I’m expanding here. In this online world, the most important thing you need is a strong domain name. If your company name is ABCPhotography, and another studio already has the domain, just by promoting yourself as ABCPhotography will cause some people to head online and type ABCPhotography.com to find your site. If your competition comes up instead, you may loose quite a bit of business.

Also think about different spellings of your name, and how other people may choose to find you. How about your name? Just because your studio is ABCPhotography doesn’t mean they won’t try to find you by your name – especially if you are the only photographer there. I’ve had LoriOsterberg.com for years, and change it all the time to give people an overview and link them up to my various sites.

Make it a winning name.

What if I told you my business name was Lost Images? What comes to mind? Why would I trust a photographer who loses images? A business name must match the industry, and provide quality assurance in what you do. A moving company would never choose Babyland Moving. You’re mixing two different ideas, and confusing your potential customers.

Also watch for hidden meanings, or names that people ask about the opposite. A name of “Creative Focus Photography” or “In Focus Photography” leads to the question, “Is focusing going to be an issue with this company?” What looks good on paper may have a whole different meaning when you say it out loud. Ask your friends and family about your ideas. What questions come up when they hear your name selections? What visuals come to mind?

Words have positive, neutral and negative connotations. Putting different types of words together can bring on entirely new meanings, and affect the way people look at your business. For example, Mom is typically associated as being a strong, positive word. When you think of Mom, it brings out the positive emotions in most of us. Mother, however, is more neutral.

Also watch for word inventions. Places like Amazon or Chryticlania are perfect examples. Amazon is now associated with online shopping, and they spent millions branding that, and making sure you associate Amazon with shopping. Chryticlania is a word I made up, and it probably took you a few seconds to sound it out and try and decipher how to say it. And that’s where your focus went – how do I say/spell it? That was above and beyond trying to decide what it is. As a small business, you don’t have the opportunity to spend millions branding. People have to know instantly what you do and what you offer. Don’t make it difficult. Keep it simple. And most of all make it memorable.

Thursday, December 9, 2010

12 Video Tutorials for Improving Your Photoshop Skills

12 Video Tutorials for Improving Your Photoshop Skills

By Light Stalking


Photoshop can really be a photographer’s best friend or worst nightmare. It all depends on how comfortable you feel in the program and whether you know the simple tips and tricks to creating photo magic. Here are 12 video tutorials for improving your Photoshop skills quickly.
Essential Resize and Color Photoshop Skills - A quick and dirty overview of how to resize and fix the colors of an image before printing or adding it to the web. This is the first step in improving your Photoshop skills and only takes minutes to master.
Cleaning Up a Photo’s Background – Learn how to clean up the background or stray elements of an otherwise beautiful shot. The tutorial is done on a model shot, but this method works very well for all types of photography.
Fixing Lighting Issues - In this tutorial you will learn how to fix common lighting problems caused by over and under exposure. Don’t let a simple thing like exposure ruin your shot!
Sharpening and Unsharpening – Discover how to bring up the details you want and fade out the ones that you don’t in this easy to follow tutorial. Once you’ve mastered the basics of this method, have fun applying it to the different levels of an image for interesting effects.
Adding and Removing Tattoos – Sometimes is becomes necessary for a tattoo to be removed from a photo (usually by the subject’s request). Learn how to do this quickly in this tutorial, as well as a fun way to add tattoos to models.
Removing Red Eye From People and Animals – Find out how to remove that infamous red eye or even “pet eye” without detracting from the overall picture. Now you will have no worries when photographing wildlife!
Create Glowing Skin – Add that glamour-shot soft glow to any model’s skin with just a few steps and this simple tutorial. This is also a great way to improve skin tone and texture at once.
Change a Color Photo to a Black and White One – You can make a color image into a black and white one pretty easily, but don’t stop there! Make these new black and white photos rich in contrast and value to add that professional stroke.
Coloring Specific Photo Elements – This is a fun technique which if used correctly can add interest and an artistic flair to black and white image. It is also known as selective coloring.
Using the Photoshop Curves Tool – The curves feature is one of the most powerful and misunderstood tools in Photoshop. Use it to improve lighting, values, hues, and more in an image.
Using the Photoshop Curves Tool Part 2 – Part two of the comprehensive Photoshop curves tutorial mentioned above. How to bring it all together for the perfect final image.
Combining Images – This is a creative way to take two or more hum-drum images and combine them to create one marvelous one. Go beyond simple makeovers and coloring to create works of art.
Each of these videos offers different tricks and techniques. Pick and choose the kind which work best for your photography style to get started. Improving your Photoshop skills is very easy, and can help you in post work for every type of photography!


Breathtaking Underwater Photographs that Touch Your Heart

Breathtaking Underwater Photographs that Touch Your Heart

Breathtaking Underwater Photographs that Touch Your Heart

Today I want to share some exclusive & eye touching underwater photographs. Underwater photography is the most challenging type of photography. It requires special techniques and equipments. Here is a collection of some gorgeous & breathtaking underwater photographs that touch your heart. So let’s have a look…

Breathtaking Underwater Photographs that Touch Your Heart
Your Ad Here
Breathtaking Underwater Photographs that Touch Your Heart
Your Ad Here
Breathtaking Underwater Photographs that Touch Your Heart
Your Ad Here
Breathtaking Underwater Photographs that Touch Your Heart
Your Ad Here
Breathtaking Underwater Photographs that Touch Your Heart
Your Ad Here
Breathtaking Underwater Photographs that Touch Your Heart
Your Ad Here
Breathtaking Underwater Photographs that Touch Your Heart
Your Ad Here
Breathtaking Underwater Photographs that Touch Your Heart

Hope you love this photographs. These breathtaking underwater photographs collection is only for your inspiration.