Showing posts with label Model. Show all posts

Sunday, November 21, 2010

All about exposure

All about exposure by The Erotic Photo Lounge


All about exposure - Light is the basic substance that your camera captures or records. This article explains the primary elements that govern how much light reaches your camera and makes an image too light, too dark, or exposed correctly.
What Camera to Use?
Exposure affects all cameras, so really you can use any camera to experiment with it. SLRs are most adept at controlling the different parameters though so we recommend you use an SLR if available. You can try out the same effects using a compact or point and shoot, but you may find it harder to control the individual settings.

Exposure
Exposure is the term we give to taking a shot with your camera; it is the physical light hitting the sensor (or in the old days film) in your camera. Taking a good shot means learning to control exposure using the controls discussed below (just like learning to control a car via the throttle, brake and steering wheel).

What is a Stop?
A "stop" is the basic unit of light. Every time you "go up a stop" you are doubling the amount of light reaching the camera. So to increase by one stop means you are doubling the light; to increase by two stops you are doubling again (or 4 times increase in total). Likewise, "going down a stop" means you are halving the light coming into the camera; going down two stops means you are halving again (or one quarter of the light in total.)

Luckily, you don't have to remember these conversions. Just know that going up one stop means one more "full increment" of light and going down a stop means one less "full increment" of light. Depending on your camera, you should be able to go up or down in either one-third or one-half stop increments, giving you more precise control (i.e. 3 x 1/3 stop increments = 1 stop).

Three ways to control stops
There are 3 principal ways to control the stops of light:
  • Aperture - how wide the lens opening is.
  • Shutter speed - how long the camera is exposed to light.
  • ISO - how sensitive the sensor is to incoming light.
Measuring and controlling the stops
You can't actually count the total number of stops of light coming into the camera. The camera manages this internally. What you can do is determine that there are too many stops (too bright) or too few stops (too dark) and adjust accordingly.

If you are shooting in manual mode, your camera will show you an exposure gauge. If there are too few stops of light the gauge will show on the minus side, if there are too many stops the gauge will show on the plus side, and if you are spot on it will show zero in the centre.

If you are shooting in aperture priority mode you choose the aperture and the camera will automatically pick the right shutter speed to give the correct number of stops.

If you are shooting shutter priority mode you choose the shutter speed and the camera will automatically pick the right aperture to give the correct number of stops.

If you are shooting in automatic mode the camera chooses both aperture and shutter speed itself, giving you the least control over the shots.

Refer to your camera's instruction manual for how to change shooting modes. If you have an SLR camera you should experiment with manual mode - it will be a valuable learning experience for you. However, many photographers will often shoot in aperture priority mode as they don't have to control too many things at the same time and risk missing all the action.

Aperture
Aperture is how wide the lens opening is. You can control it to be a very narrow opening or a very wide opening. A wide opening is indicated by a low aperture number e.g. f/4, which is good for portraits. A narrow opening is indicated by a high aperture number e.g. f/22, which is good for landscapes. Markings such as f/4, f4, and just 4 all mean the same thing. The important thing is that the higher the number the narrower the opening. A wide aperture (low number) lets in many stops, i.e. lots of light. A narrow aperture (high number) lets in only a few stops, i.e. not very much light. The more stops an aperture lets in (i.e. wide), the faster your exposure can be (see shutter speed below); the fewer stops an aperture lets in (i.e. narrow), the longer your exposure needs to be.

The standard aperture sizes from widest to narrowest are listed below. Each increment is one stop less than the previous one. Not all apertures will be available on all lenses; usually only the middle of the range apertures are available.
  • f/1.4, f/2, f2.8, f/4, f/5.6, f/8, f/11, f/16, f/22, f/32
Use a wide aperture (low number) when:
  • You want a short depth of field, e.g. portraits. This will make the subject in focus and the background blurry. The subject appears to "pop out" of the background very prominently.
  • There is only low light available and you need to increase the stops of light.
  • You want to freeze the motion using a fast shutter speed.
Use a narrow aperture (high number) when:
  • You want a long depth of field, e.g. landscapes. This will make both the foreground and background both sharp at the same time. The foreground will not stand out from the background.
  • There is too much light available (e.g. bright midday sun) and you want to decrease the stops.
  • You want to blur the motion using a slow shutter speed (e.g. slow blur of a waterfall).
For glamour, erotic and nude shots we recommend f/4 - f/5.6 for a portrait or bust shot, and f/5.6 - f/8 for a full body shot.

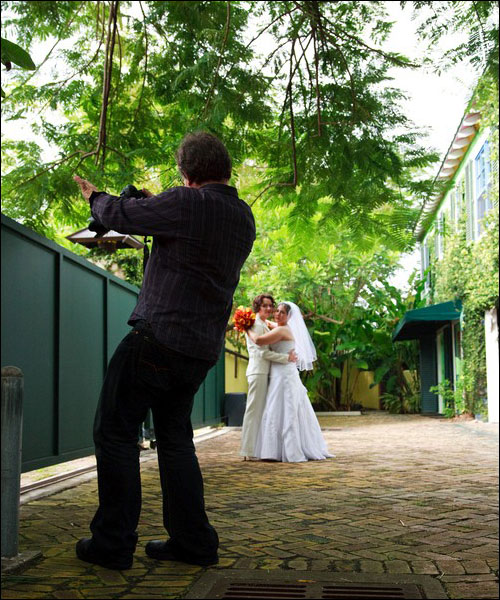
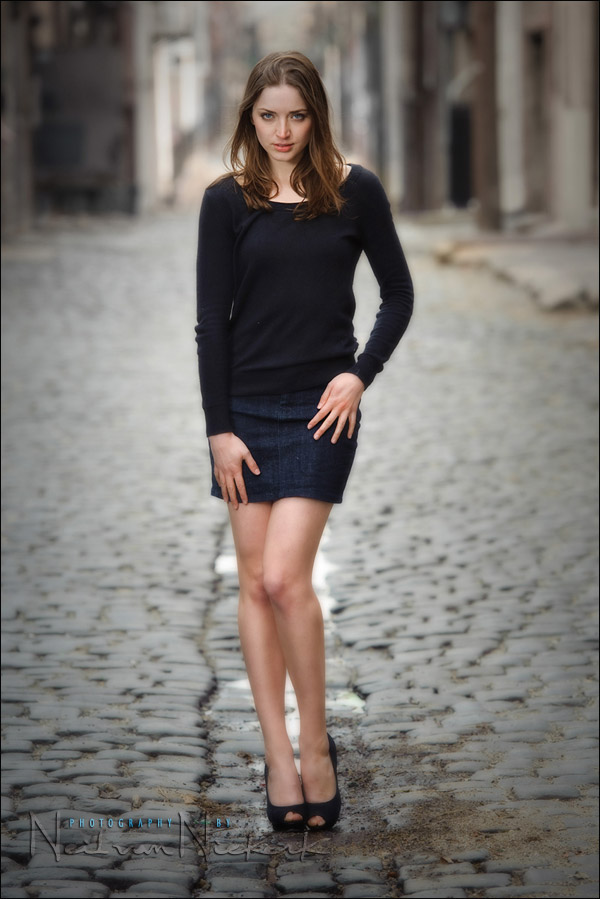
Figure 1 shows the effect of aperture. On the left is a wide aperture shot which makes the subject jump out from the background. On the right is a narrow aperture shot which is more suitable for landscapes. Notice that the left shot focuses solely on the subject, while in the right shot the subject blends into her surroundings and is not as prominent.

Figure 1. Aperture. The left shot is using a wide aperture (f/4). The right shot is using a narrow aperture (f/11).

Shutter speed
Shutter speed is how long the camera remains exposed to the light. You can control it to be a very fast exposure or a very slow exposure. Shutter speed is indicated in fractions of a second, e.g. 1/60 of a second. Markings such as 60 and 1/60 mean the same thing. (Markings such as 2" indicate 2 seconds instead of fractions of a second.) Larger numbers indicate a faster shutter speed and lower stops of light, because less light can enter during a shorter period of time. Smaller numbers indicate slower shutter speed and more stops of light.

The standard shutter speeds from slowest to fastest are listed below. Each increment is one stop less than the previous one.
  • 30, 60, 125, 250, 500, 1000, 2000
Note: you can only "hand hold" a shot with a shutter speed of around 1/60 of a second or faster; any slower and you will get camera shake due to small movements in your hands (even if you think you have a steady hand!). There are two exceptions to this. First, using an Image Stabaliser (IS) or Vibration Reduction (VR) lens you can gain up to 3 extra stops for hand holding - down to about 1/8 second. Second, if you use a tripod you can shoot really slow shots up to around 30 seconds.

Use a fast shutter speed (high number) when:
  • You want to freeze motion, e.g. a frozen water fountain.
  • You are using a wide aperture (because the aperture allows a high number of stops and you need to balance this).
  • There is too much light available and you want to decrease the number of stops.
Use a slow shutter speed (low number) when:
  • You want to blur motion, e.g. slow blur of a waterfall.
  • You are using a narrow aperture (because the aperture only allows a small number of stops and you need to balance this.)
  • You are shooting in low light and you need to increase the stops of light.
For glamour, nude and erotic shots we recommend a shutter speed of at least 1/60 of a second. If your shutter speed indicates faster than about 1/2000 of a second then there is probably too much light around and this may result in other problems such as the model squinting or too high ISO.

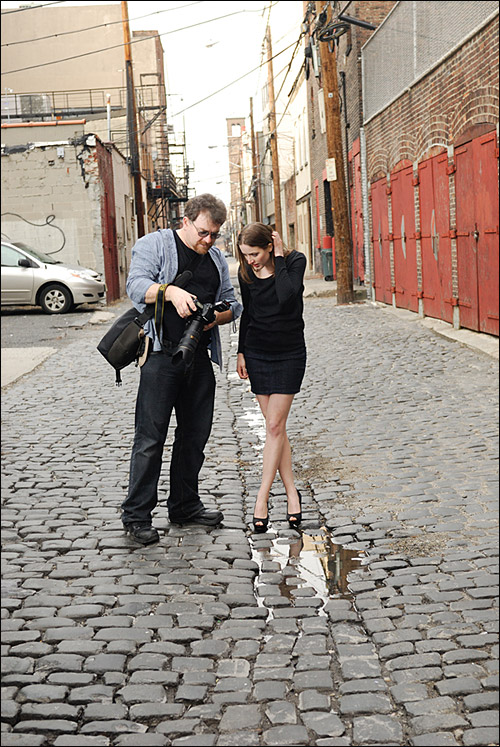
Figure 2 shows the difference that shutter speed makes. On the left is a slow shutter shot which creates blurring of the water. On the right is a fast shutter shot that freezes the water mid-motion. For portraits and glamour shots shutter speed is not much of an issue, other than making sure you can hand hold the camera or controlling motion of water if your model is in a waterfall etc.

Figure 2. Shutter speed. The left shot is using a slow shutter speed (1/15 using a VR lens). The right shot is using a fast shutter speed (1/250).

ISO
ISO is how sensitive the camera is to incoming light. You can control the camera to be very sensitive so that it takes only a little light to illuminate the image (increases the number of stops) or not sensitive so that it takes much more light to illuminate the same scene (decreases the number of stops). ISO is marked in hundreds, e.g. ISO 100. Larger numbers indicate high sensitivity to light; lower numbers indicate less sensitivity.

The standard ISOs from least sensitive to most sensitive are listed below. Each increment is one stop more than the previous one. Not all cameras have all ISOs available.
  • 100, 200, 400, 800, 1600, 3200
Originally ISO was how sensitive film was to light. By inserting film with a fast ISO that reacted more quickly to the light we could take low light shots. The camera now controls the same function since it uses a digital sensor instead of film, but ISO retains exactly the same purpose.

Note: high ISO numbers result in "noise" in the image. These are slight variations in the color of each pixel, e.g. instead of being plain brown, the noise will introduce small flecks of light brown and dark brown in random patterns. In the film days this was called film grain and had a more pleasant, grainy appearance. In digital it just looks noisy. Significant noise is usually detectable around the 800 or 1600 ISO level, depending on your camera.
  • Use low ISO (lower numbers) for most conditions, such as bright sunlight, on a tripod or wide aperture.
  • Use mid ISO (around 400) when shooting mid light situations such as early evening, heavy shade or an overcast day, or when you want a really fast shutter speed for sports.
  • Use high ISO (high numbers, 800 and above) in low light situations such as a dimly lit room. Even in low light situations prefer to use a slow shutter speed, wide aperture or tripod before cranking up the ISO too high.
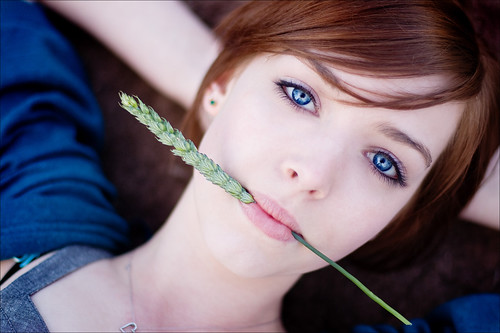
Figure 3. High ISO vs Low ISO closeups. The left shot is using high ISO and ambient light only. The right shot is using low ISO and a flash.

Balancing Aperture, Shutter Speed and ISO
Getting the right number of stops of light into the camera is a balancing act between aperture, shutter speed, and ISO. If you go down one stop in aperture (halve the light) then you can counteract this by going up one stop in either shutter speed (slowing it down) or ISO (increasing the sensitivity to light). Remember it as three corners of a triangle - aperture, shutter speed and ISO - that always have to remain balanced to get the right exposure.

Typically you start with a question: "how do I want to shoot this scene?" If your emphasis is on short depth of field (wide aperture) or long depth of field (narrow aperture) then you'll start with that and choose the other factors to suit. If your emphasis is freezing motion (high shutter speed) or blurring motion (slow shutter speed) then you'll start with that instead.

Useful Shooting Combinations
By using the tips above you can come up with sensible combinations for most shooting conditions. If you face a really difficult situation where no combination of settings gives you a good shot, this probably indicates that the available light is not adequate and any image would turn out poor (unless you introduced extra light such as a flash). Some combinations to remember are:
  • Portraits (face or bust): wide aperture (f/4 - f/5.6), low ISO (100 or 200) and mid shutter speed to suit (1/60 - 1/250 as a general guide). This will produce sharp facial features and a nicely blurred background, which focuses attention on the subject. Still life, food, or macro (close-ups of small objects): use the same settings as portraits above.
  • Full body portraits: medium aperture (f/5.6 - f/8), low ISO (100 or 200) and mid shutter speed to suit (1/60 - 1/250 as a general guide). This will produce a sharp shot of the body and its immediate surroundings. Distant backgrounds will still be slightly blurry and give emphasis to the subject. If you want to give greater emphasis to the subject then use a wider aperture (e.g. f/4) but be aware that depending on the pose not all of the body may be in focus.
  • Sports or movement: to freeze movement use a wide aperture (f/2.8 - f/4), medium ISO (400 to 800) and a high shutter speed (1/250 or above). This will freeze the movement quickly enough to capture it. To blur motion use a slower shutter speed (e.g. 1/60, or even lower with an IS / VR lens), low ISO (100 to 200) and a narrow aperture to get that motion blur. Sports is one situation where speed priority shooting is easier to control than aperture priority shooting.
  • Landscapes: narrow aperture (f/11 - f/16), mid ISO (200 - 400) and slower shutter speed (1/30 - 1/60) will make the whole scene sharp. No one element will stand out more than the others. Hold your breath slightly while taking the shot to help stay perfectly still. If your landscape has a large range of distances in the shot you can use even smaller apertures (f/22 or above) but you will need a tripod or IS / VR lens to cope with the slow shutter speeds involved.
  •  

Getting started with amateur modelling

Getting started with amateur modelling


Getting started with amateur modelling - This article is a few pointers to get you started posing for the camera if you're new to modelling or if you're a bit nervous. Photographers will also find this information useful for dealing with models.
Erotic Photo LoungeYou can apply this information whether you're a husband & wife or boyfriend & girlfriend who are taking some sexy photos for fun, or if you're just starting out working with different photographers. It's intended to be some helpful advice to those new to amateur modelling; it is by no means a professional modelling instruction guide.

Agreeing on the shoot
You and the photographer should agree on the basic direction of the shoot upfront. You should both agree on at least: when the shoot will occur; where it will take place; what type of look you are trying to achieve; any special requirements for costumes or make-up; and any boundaries you will or won't cross e.g. nudity, explicit shots.

Of course photo shoots can be spontaneous or can change direction mid-stream. But they should have a basic plan that you and the photographer can agree to.

Preparing for the shoot
It's important to prepare yourself for the shoot properly. Make sure you feel good about  yourself so you are happy to pose - it's easy to spot a model who doesn't want to be there and this makes it unpleasant for everybody. In the week leading up to the shoot do not do anything that might leave a mark or blemish on your skin, like an uneven blotchy tan, sunburn, or a beauty treatment where your skin might react badly. Don't experiment with dying your hair the night before in case anything goes wrong and you can't fix it in time. Dark tan lines and too much fake tan should usually be avoided as well.

The day before the shoot or on the day itself take time to prepare your body and face. It's a good excuse to pamper yourself! You should pay careful attention to grooming your face (e.g. plucking eyebrows etc), grooming your body (e.g. wax/shave your legs, Brazilian wax/shave, etc), giving your skin a healthy looking glow (e.g. light scrub), getting your nails polished or painted, and your hair in place (e.g. cut, curled, washed, straightened, etc). If you're shooting nude, then take special care with your pubic area not to get razor burn or reactions to any skin creams etc.

Don't have a big night out on the town the night before your photo shoot! You will look tired in the photos.

Just before the shoot you should check with the photographer as to what you'll require. You should always check the look of the shoot before applying any make-up.

Indentation marks
Prior to the shoot you should not wear any tight or constricting clothes - including tight underwear- as these will leave indentations marks on your skin. If you are shooting nude, lingerie or bikini, you should arrive at the shoot wearing loose, comfortable clothing only and no underwear (no bra or panties / knickers) - you can put these on during the shoot of course, but by this stage they will the right ones for shooting in and will not have left any indentation marks on your skin. Otherwise change out of them and into something looser (e.g. a robe) as soon as you arrive so that your skin has time to "breathe" out the indentation marks - allow at least an hour for this.

Outfits and make-up
Before you choose an outfit, you will need to know a little about what the photographer intends to shoot. Will the setting be indoors or outdoors? What is the mood or theme? Are you required to play a special character or role? Make sure you take several outfits to choose from, in case one doesn't look perfect and you have to swap to something else.

If you're shooting nude then obviously clothes are not a consideration. However, you should still think about an outfit of accessories like shoes, belt, jewellery, scarves, wraps and so on. If well chosen, these accessories can really lift your look considerably than just plain nude. The right accessories can lift all types of shots, not just nudes.

Make-up for glamour photos tends to be heavier than normal day to day make-up. You should wear a proper foundation. Whilst applying your make-up, pay careful attention to the type of look you're trying to achieve. Often the photographer will have some ideas of how they want you to look, e.g. a vamp, a showgirl, someone innocent, etc. Two ideas can really help when choosing make-up: how the role or character you're playing in the shoot would want to look, and pretending that you are getting dressed up to go out somewhere fancy and glamorous. (Well, it is a "glamour" shoot after all!)

Take spare outfits and make-up with you so you have it on hand in case you need it.

Breaking the ice
Before you start the actual shoot, you should sit down for a few minutes and discuss the concept or basic direction of the shoot, what you will and won't shoot, where your boundaries are, and ideas that you have. Once you've finished the chat you should both have a good feeling for what each other is attempting to convey in the photos. And you should be on friendly and cooperative terms for the rest of the shoot.

Working with your photographer
Usually your photographer will give you some direction - the same as a director does on a film set. They will indicate what type of photos they are trying to take and what they would like you to do. If a photographer (perhaps your boyfriend or husband) has no idea what they want you to do, then you're a little bit stuck I'm afraid! Of course you can step in and lead the shoot (and please do). However, in practice it tends to be a bit like ballroom or latin dancing - the man (in this case photographer) has to lead or the dance falls apart - even though all eyes are on the girl!

Most photographers welcome ideas from the model and they often turn out great. But convey your ideas to the photographer and have him or her run with them, instead of just taking over yourself. The photographer can see the whole scene from where they are standing - and you can't because you are in it - so you are relying on them to make sure the whole scene works.

Relaxing in front of the camera
If you feel tense you will look tense on camera - no matter how much you try to hide it, it will still show through. The only solution which really works is to relax. There are a number of things you can do:
  • Role play. You went to great care to create a look for the shoot, including costume, hair, make-up, accessories, etc. So you should definitely slip into that role and pretend to be that character. For example, if your look is showgirl then pretend you are a sleek and graceful Vegas showgirl.
  • Chat to the photographer in between shots. Talking will often calm you down and you will feel more comfortable.
  • Move around in between shots, shake your hair out, have a stretch, exercise your face. When you stay in one pose for a while your muscles become tense, including your face. Stretch them out from time to time.
  • Have a drink. One or two alcoholic drinks can really help to relax you. But don't have too many - if you feel drunk then you will look drunk on camera, and that is not a good look!
Taking time-outs and resting
It's important to stay rested during the shoot, especially if it's a long one. Take regular breaks in between poses or in between outfits. Take a break every time the photographer plays with their camera.

Don't starve yourself either before or during the photo shoot. You will not be able to concentrate, you will not enjoy it, and the photos will suffer as a result.

Inputting your ideas
Most photographers love to hear your ideas. Don't be shy to mention them. But as I described above, you can't really direct the scene because you're in it, so you should clearly describe or show your vision to the photographer and then let them direct it for you.

Chaperones, and switch off your phone
This section will only be relevant if you are being shot by someone who is not your boyfriend / girlfriend / husband / wife. You should definitely check a photographer's references before the shoot and make sure that what they claim actually checks out.

Chaperones (people attending the shoot with you) are a touchy topic. Some photographers don't mind at all yet others dislike it a lot. As a general rule, when you're modelling for someone other than your partner, if you bring a chaperone with you they should not be a husband, boyfriend, mother, etc. The problem is that just them being in the room will make you more stiff; it might sound ironic but you are more likely to relax, flirt with the camera and bring out your sexy side if they are not there. With boyfriends in particular, models have a tendency to look to them for approval of each outfit or each shot, and this breaks the connection with the camera. And boyfriends' jealous nature often comes out when they see their girlfriend disrobing for someone else. If you do bring a chaperone make it someone at arm's length like a friend of the same sex.

Some photographers will not mind if your chaperone stays for the shoot, but in these cases make it very clear to the chaperone that they are there only to observe, and they must remain silent and stay at the back of the room away from the shooting area.

Other times, e.g. if you're shooting nudes, having a chaperone can make you nervous. Some photographers believe that models who insist on chaperones are a little paranoid and tend to be inhibited or unwilling to bare their soul for the camera, but others don't mind it. If you want to make sure that you are ok, do some background checking first. Perhaps get your chaperone to meet the photographer and have a look around to see that everything is legitimate, then ask them to leave and come back at the end of the shoot. Alternatively tell someone when you're going to a photo shoot and leave the photographer's details with them as a safety measure.

And it goes without saying - turn off your phone for the duration of the shoot.

Legal stuff
If you're posing for someone other than your partner or not just shooting for fun, then make sure you sign a model release for the shoot. Ensure that you agree with everything stated in the release and bring along your ID or a copy of it for their records.

And the most important advice is - have fun!

Friday, November 19, 2010

tips for posing people / working with a model


tips for posing people / working with a model

So you have a great camera and lens; and someone who is willing to be photographed and willing to work with you; and you have a great idea for a setting or backdrop … but now what?

Quite a few people have asked about advice on posing their subjects in the thread on future topics for the Tangents blog. Posing your subject is something that can be quite intimidating to a newer photographer.  The pressure is now on YOU to create magic .. or at least an arresting image. Leaving everything up to the model or your subject to do, or for them to come up with ideas … while you just click the shutter, makes you just an owner of a camera, and not a photographer.

When photographing portraits of people then, at some level you need to be able to pre-visualize what you want.  Or, recognize when you actually have something in front of your camera that makes a good subject.  The point I’m aiming at here, is that if you want to photograph portraits of people, you can’t be passive.  At some level you have to exercise control, whether it is the location or the light, or some element that you add or make a decision about.  You have to be active in creating the portrait.  And this often means directing your subject or posing them.


In my experience, the best models aren’t necessarily the more beautiful women, but rather those who can project some personality. No shyness. I think the best models are actresses at some level. You really have to act a little .. whether expression or body posture.

The photo above is of my assistant, Jessica. While she isn’t a professional model, and doesn’t have much experience .. she has an attitude that she projects. And it works. She was one of the best models I’ve had. Simply because of her personality.

The best models have great personalities and are quite comfortable in front of the camera. I think it comes down again to them being able to project ‘something’ towards the eventual viewer. It need not be something dramatic … it can be something as cute as a wrinkle of the nose; a half smile; a small gesture.

Okay, so that’s great if you have a model or subject who is somehow a natural at it, and needs little direction.  What if you have a subject who has little or no experience?
Well, this is where YOU have to step in as the photographer …

my 3 best tips on posing people:


1. have your subject mirror your pose

When you want your subject to pose in a certain way … get in there and SHOW them by having them mirror your pose. Instead of giving verbal instruction such as, “move your left hand up a bit” – which can be confusing – it is better if  YOU mirror her, and move your hand how you want it to. That visual cue is much easier to follow than a verbal instruction.

Same thing if you want your model (or subject) to move their shoulder a bit, or position their legs. Just show it and have then copy you, mirror image. It is funny when I do it, since I don’t look as elegant as the model. Or rather, she shouldn’t look as inelegant as I do!  Which is part of keeping a photo session light and fun.

But it really does help to get in there and physically show what you had in mind. Verbal instruction can be confusing, especially with left & right and mirror image.  So I very often physically demonstrate .. as anyone who has been to one of my workshops already know. ;)

Here is a photo of myself at a destination wedding where I was the photographer, where I am showing the couple what I had in mind … it might look like I am doing Tai Chi here though.


It’s just easier for your subject to follow your cue if they can see what you want.

2. do your homework; internalize a few ideas

The best suggestion I have then for posing someone, is for them to mirror your movement and positioning … which doesn’t work at all if you have no idea where to start.

It is good homework then for YOU to practice in front of a mirror.  See if a specific pose or idea works.

- What can you change about the position of your hands and feet to improve the pose?

- If you hold your arm in a certain way while looking at it in the mirror, is there a fore-shortening effect?

- What happens if you bend your knee in a certain way?

And so on.  Explore.  I know it might sound silly, but there is no real way you can pose someone else if YOU have no idea how to do it. Your instruction will be hollow advice to someone who has no idea how to pose themselves.  So this comes right back to the initial advice – get in there and be active.

It is also a good idea to look at clothing catalogues as an example.  The poses shown in that link are fairly simple – but they work. Internalize a few ideas so that you can use them at a later date.  If you have a dozen or so simple poses to use as reference, then you can more easily improvise from there.

3. give your subject feedback and positive instruction

Regular readers will immediately recognize Anelisa, who is my favorite model to work with.  She is energetic  and has a great personality.  She constantly changes her positioning and movement; changing between shutter clicks, making every moment different.


She also comes up with ideas, and this makes her great to collaborate with. This brings up a very important point …

give your subject / model feedback and positive instruction


Your subjects most likely have no idea what you’re seeing through your camera.  They have no idea how you are framing them in relation to the background. So quite often it might not make sense to your subject why you chose *this* particular spot for them to stand in.

This is where digital cameras are fantastic – they offer the opportunity for you to show your subject what you’re getting.  It is a great boost for their self-confidence, and a great boost in their confidence in you as the photographer.  It’s all about the collaboration between photographer and subject.  Seeing how they appear in the photograph, is also of immeasurable help to your subject in seeing if they want to change something.
The key is to make your subject comfortable about working with you, and finding the setting for them.

I worked with another photographer some time last year on a shoot. He’d set up a shot .. and then would look at his camera’s preview, and go, “Hmmm, this is not working for me.” .. and then set up something else.  I felt it just didn’t help much, since it does nothing to reinforce the model’s confidence. It could even be misconstrued by the model as being critical of her.

Much better to show the model what you got in your camera, and how you want to adjust something in the set up. Or explain how the way YOU set it up, didn’t quite work, and that she is doing great .. but you want to change things up a little bit, or move on to another spot.

That reinforcement and encouragement is subtle, but I feel it helps keep the rhythm of the shoot going.

Finally, a quick note about people skills, although much of it is self-evident advice:
- Keep a professional demeanor, but make it fun. Keep it relaxed.
- Give instruction to your subjects. Help them adjust to what you want.
- Talk to them. Give feedback, and keep it light.
- If you work with a model, pay for lunch or coffee.
- Be enthusiastic.

Friday, November 5, 2010

Add the Model Look to Your Portraits with These Photoshop Tips

Add the Model Look to Your Portraits with These Photoshop Tips

By Christopher O'Donnell on


Having a “model look” to your portraits is a bit more than just great lighting and using a sharp lens – while you can create stunning, magazine-quality photos with just your camera, you can bring out the true beauty in your images using a few simple Photoshop techniques.

1. Soften the Skin

Having professional-grade camera equipment is certainly a benefit, but not all of your clients can share your enthusiasm. Typically, a DSLR will show far too much detail for the discerning portrait client, meaning your photos will require some skin softening to even out the complexion. My skin-softening tutorial here will help you smooth out any imperfections without drastically changing your model’s face or appearance.

20090618-40D-01132

2. Add a Catch Light

A “catch light” is the reflection in your model’s eye from a light source – typically it’s studio lighting but can also be natural sources (such as sunlight filtered through a window). You’ll often find that most glamour portraits have some kind of catch light reflection which provides a certain level of interest – thankfully, you can add this in Photoshop if the eyes of your model are looking particularly flat with this video tutorial.

Oh my God I look Cute!!

3. Exposure Blending

Typically, a model’s portrait will have the skin exposure set to just under the blown highlights mark – or rather, when the histogram is almost all the way to the right (for just the skin tones). However, when you make this adjustment, it may drastically over or under expose the rest of your image.
You can rectify this easily with RAW in Photoshop – import one photo exposed for your model with the exposure just below the blown highlight point, and another exposed properly for the background. Using layer masks, blend these two layers together to create a properly exposed portrait with model-like clarity. This should be done before any other editing to your portrait.

4. Adjust Your White Balance

Taking the time to do a custom white balance with your camera is usually better than doing it in post process, but it may not always be possible depending on how fast-paced your work environment is. When you bring your image into editing, make sure you adjust it for the skin tone above all else. The key to a successful model-like portrait is accurate skin tones!

Here’s our tutorial for Lightroom, but a great Photoshop technique is described here in a video tutorial.

5. Burn Your Edges

At the end of your editing workflow, try burning around your subject to redirect attention onto your model. This will help eliminate distracting elements such as a bright or busy background, which will make your portrait stand out more. This of it as a custom lens vignette that hugs the shape of your model.

Click here for our dodging and burning tutorial for Photoshop.


While editing can improve a great glamour portrait, it can’t create one for you. A stunning photo starts with your camera and environment, so put some time and effort into creating the right lighting and setting for your model.

If you need some help with studio lighting and angles, make sure to check out this lighting cheat sheet to create the optimal setup for your main light, which you can then use alone or add some fill lights to soften the shadows.

We also have a helpful portrait tutorial on studio portraits, as well as one on outdoor portraits.

Read more great articles by Christopher O’Donnell at his blog or follow him on Facebook.